 | How to: Add social widgets to your website11 April 2014 | Cate |
Skill Level: Beginner
The majority of social sites have their own widgets that can be placed on your website. A widget is a small application created by the social site and added to your website to display something related to your social profile. All social widgets can be added to your website either as a block or within page content but the code must be placed within the Source otherwise it won't work.
To add a widget to your site using a block follow these steps:
- In the admin panel, go to Design > Content Blocks and click on Create New
- Give your block a name and click on the HTML button next to Block Content within the Content tab
- Paste in your widget code, click on Accept Changes and save
- Assign the block to your layouts as normal
To add a widget to your site within a page follow these steps:
- In the admin panel go to Pages > View and go to the page you want to add it to
- In the Content tab click on the HTML button next to Page Content
- Paste in your widget code when you want it to appear and save
Facebook
Facebook offers two widgets, the Page Posts, which shows the five latest posts to your page, and the Friend's Faces, which displays the profile pictures of the people who already like your Facebook page or you can have a combination of the two. Below we have shown the widget with both the Page Posts and Friend's Faces displaying.
Activity Feed
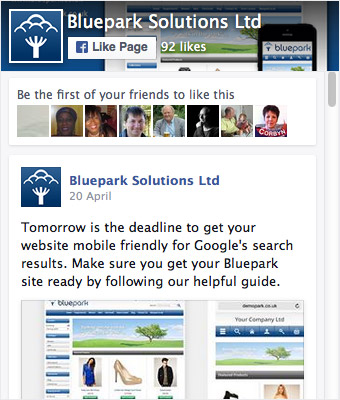
(Image used for display only)
To add the Facebook widget to your site just follow these steps:
- Go to https://developers.facebook.com/docs/plugins/page-plugin
- Type in your Facebook Page URL in the first field
- Don't worry about setting a width but make sure you put the height you want the widget to be in the Height field
- Tick the Adapt to plugin container width option
- Choose what you want to display on the widget by selecting any of the Use Small Header, Hide Cover Photo, Show Friend's Faces and Show Page Posts options
- Once you are happy click on the Get Code button
- Highlight and copy the JavaScript code and paste this into the Opening body (developers) field in the Site tab of your theme
- Add the second piece of code to your website as instructed above
Twitter
There are a few widgets available from Twitter but the main one is the User Timeline. This displays all of your latest tweets and, optionally, your replies to others.
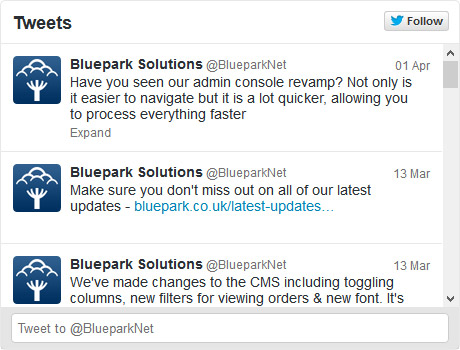
(Image used for display only)
To add the Twitter User Timeline to your site follow these steps:
- Go to https://twitter.com/settings/widgets/new
- Make sure your Twitter username is correct in the Username field
- Choose whether you want to include your replies and whether you want the widget to auto expand photos
- Choose a light or dark theme and set a colour for the link text
- Click on Create Widget
- Highlight and copy the code
- Add the code to your website as instructed above
Pinterest
Pinterest offers several useful widgets for your website, the Pin Widget, which displays just one of your pins, the Profile Widget, which displays a selection of all of your pins and the Board Widget, which shows a selection of pins from one of your boards.
For all Pinterest widgets go to http://business.pinterest.com/widget-builder
Pin Widget
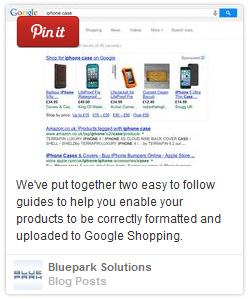
(Image used for display only) | To add the Pin Widget to your website follow these steps: - Select the Pin Widget on the widget page and add in the full URL of the pin you want to use
- Click on the Build It! button and highlight and copy the code
- Add the code to your website as instructed above
|
Profile Widget
(Image used for display only) | To add the Profile Widget to your website follow these steps: - Select the Profile Widget on the widget page and add in the full URL of your Pinterest profile
- Choose whether you want a Square widget, a Sidebar widget which is portrait in layout, a Header widget which is landscape in layout or a Roll Your Own widget which allows you to set your own sizes
- Click on the Build It! button and highlight and copy the code
- Add the code to your website as instructed above
|
Board Widget
(Image used for display only) | To add the Board Widget to your website follow these steps: - Select the Board Widget on the widget page and add in the full URL of the board you want to use
- Choose whether you want a Square widget, a Sidebar widget which is portrait in layout, a Header widget which is landscape in layout or a Roll Your Own widget which allows you to set your own sizes
- Click on the Build It! button and highlight and copy the code
- Add the code to your website as instructed above
|
LinkedIn
There are a lot of widgets available on LinkedIn but the main two that you may want to use, depending on what type of profile you have, are the Member Profile widget for an individual's profile or the Company Profile widget for a company's profile.
Member Profile

(Image used for display only) | To add the Member Profile to your website follow these steps: - Go to https://developer.linkedin.com/plugins/member-profile-plugin-generator
- Enter the web address to your public profile (not available if your profile is hidden) in the Public Profile URL field
- Choose Inline in the Display Mode options
- Decide whether you want your LinkedIn connections to show underneath
- Click on Get Code and highlight and copy the code
- Add the code to your website as instructed above
|
Company Profile

(Image used for display only) | To add the Company Profile to your website follow these steps: - Go to http://developer.linkedin.com/plugins/company-profile-plugin
- Enter the name of your company as it appears in LinkedIn in the Company Name field
- Choose Inline in the Display Mode options
- Decide whether you want your LinkedIn connections to show underneath
- Click on Get Code and highlight and copy the code
- Add the code to your website as instructed above
|
Now your customers have no excuse but to follow you on Facebook or tweet you on Twitter and if you missed our previous posts on How to: Add Social Share Buttons to Your Website and How to: Link Your Website to Your Social Profiles just visit our blog.