Understanding how images work on the internet, before you start uploading them to your website, can stop all sorts of problems occurring later on and causing you to have to re-do them. Use our easy guide to make sure your images are optimised for use on your online shop. You may photograph your products yourself or perhaps your suppliers provide you with stock product shots. No matter where you obtain them from they will always need to be optimised before uploading them to your site. Editing and resizing your photosFirstly, you will need to check the size of your images. If they're taken straight from a camera or are supplied to you, they may well be very large. But what is too large? Well, it depends on where it's going to be displayed on the site. A general rule of thumb is to make sure no image is any bigger than 1000px in width and 1000px in height, unless you can ensure the file size will be kept to a minimum. However, certain images, such as the website’s background image or full-width slideshow images will often need to be bigger.
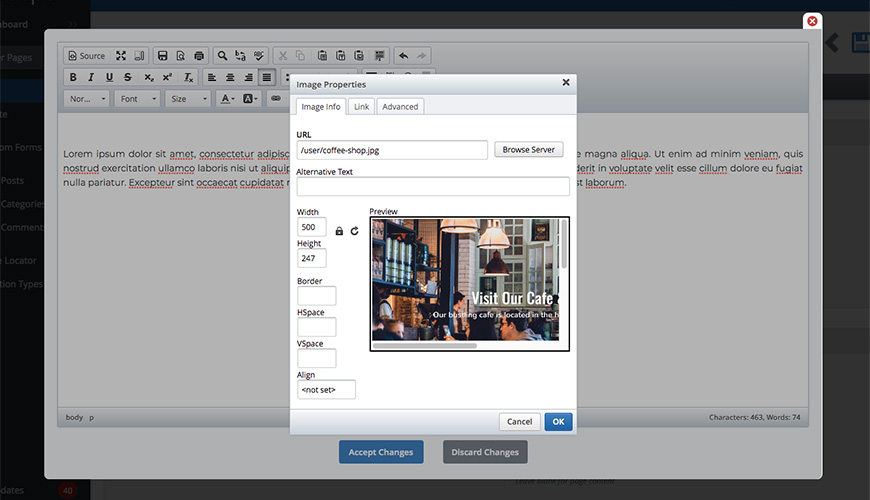
If your images do need resizing you can do this within a graphics or photo editing software package, such as PhotoShop, which Adobe has made much more affordable by offering a monthly subscription. However, there are plenty of free photo editing software packages available online too, which you can find by searching on Google. A couple we would recommend are Photopea and the ever popular, Gimp. Avoiding common mistakes with image sizingYou should never upload images to your site and assume they will fit. Websites have fixed amounts of space for certain areas such as product images or homepage banners. You need to know the size of the area you wish to put the image into before you resize it. If you're unsure of the size of image you should be doing on your site, get in touch. Adding large images and setting them as smallerA common mistake is to upload large images and then setting the size as smaller during the upload process or by changing them in the Properties pop-up in the Content Editor. This masks the size of the image using HTML code and doesn’t actually resize it. This means when someone views the page with that image on it, the web browser will need to load the large image in the background and then set it to the correct size on the screen. This will ultimately slow your page down, something Google doesn't like.
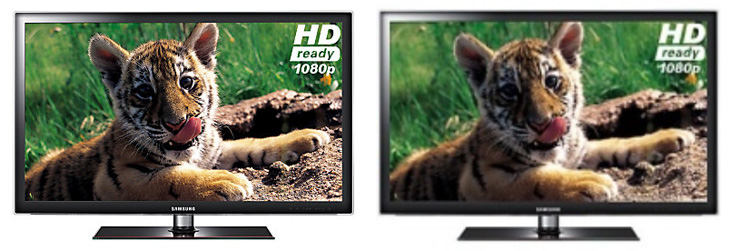
Making small images largerTrying to resize images upwards to make a smaller image larger doesn’t work either. All this will do is pixelate your image and make it look blurred. This will happen if you resize upwards in your photo editing software or if you set the width and height as larger than the image actually is in the Content Editor.
Image 1 is resized correctly. Image 2 is a smaller image that's been resized up to the required size. Keeping an eye on image file sizeOne thing you will need to take into consideration is the actual file size of an image. This is not the width and height but rather the amount of web space it will take up. Best practice is to keep all website images below 200KB, however, the lower you can go the better to reduce page load speed.
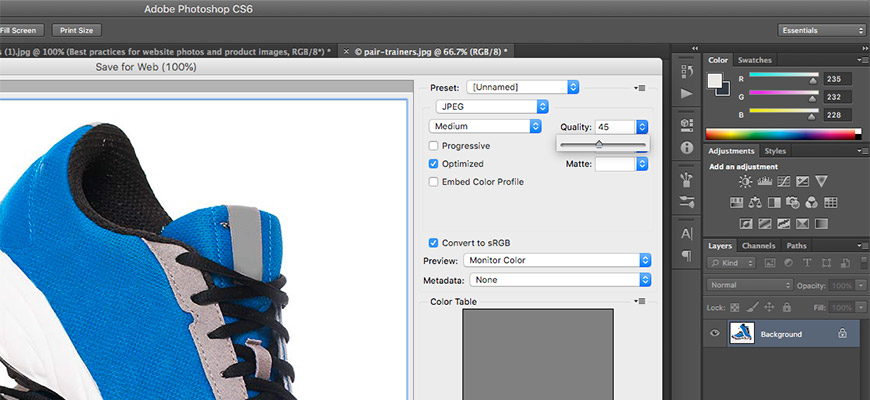
You can reduce the file size by reducing the quality of the image and re-saving it. Website images do not need to be high quality, so try to find a happy medium between quality and low file size. Many photo editing software packages have the option to optimise your file size during the save process but there are also a few free online services that can do it for you, if you don’t have access to software. A couple of examples are EZGif.com's JPEG Optimizer and Dynamic Drive's Online Image Optimizer. Saving images in the correct formatWeb images vs print imagesThere are two types of colour modes that images can be presented in, RGB and CMYK. The CMYK (Cyan, Magenta, Yellow and Black) colour mode is used for high quality printing to create a crisp, clean image and should never be used for website images. All website images must be in RGB (Red, Green, Blue) as all monitor, TV, mobile phone and tablet PC screens are built in Red, Green and Blue. The Bluepark system will give you a warning when you assign a CMYK image to a product in the Product Editor but it is always best to check first, particularly if they have come from a supplier. You can do this by opening your image in a photo editing software package and selecting Mode. If it is set to CMYK, change it to RGB and re-save the image.
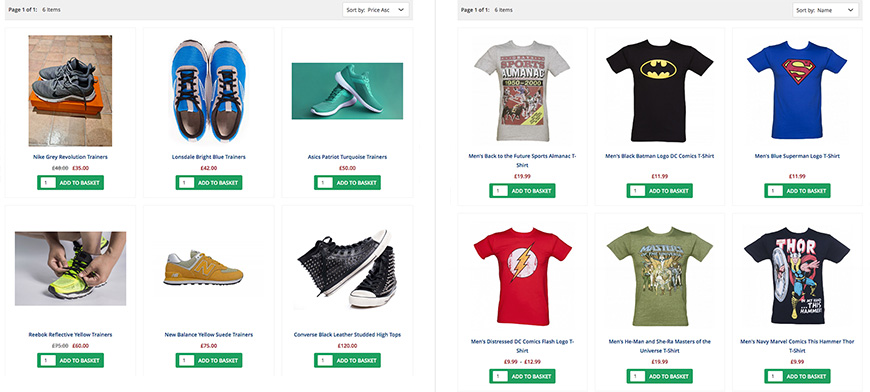
Saving in the correct file typeWebsite images must only be saved in certain formats, with the most common being JPEG, GIF and PNG. Web browsers will struggle to render non-web formats, including BMPs and TIFFs, so should never be used. The general rule is, if the image is small graphic (not a photograph) or an image with a transparent background, then it should be saved as a GIF, PNG or an SVG. Then, if the image is a large photograph or graphic, it should be saved as a JPG. This is because you can reduce the file size of a JPG by tweaking the quality of the image within photo editing software, something that can't always be done with other file types. Keeping product images consistentIt is always best to keep your product images to a consistent size, shape and style right across your online shop. This will ensure a clean, professional look to your site that visitors will trust and be happy to purchase from. Below is an example of inconsistent product images on the left and consistent images on the right. You can immediately see how much better the consistent images look and are so much more professional looking.
Image backgroundsProduct images are always best when the background is kept clean and clutter free and with the same background colour, ideally this would be set to white. The photos should be cropped close to the actual product within your photo-editing software, rather than leaving lots of white space around it, to ensure the product appears larger on the screen. Image shape consistencyIf some of your product images are rectangle, with some landscape and some portrait, and then others are set to square, this will create a messy look when they're added to the site. Therefore, cropping all product images so they're square, rather than rectangular, will help images to sit in a clean, grid-like fashion. The only exception for this would be if all of your products were the same shape. For instance, if you only sell DVDs, then you'd most likely want to keep the images set to a portrait rectangle shape. However, you will need to ensure the ratio of its width to its height is the same on all. For instance, set the rectangle shape so it is twice as tall as it is wide on all product images. Image shape consistency, or aspect ratio consistency, is vital for V2 themes, as well as selling platforms such a Google Shopping, Facebook Shop and eBay.
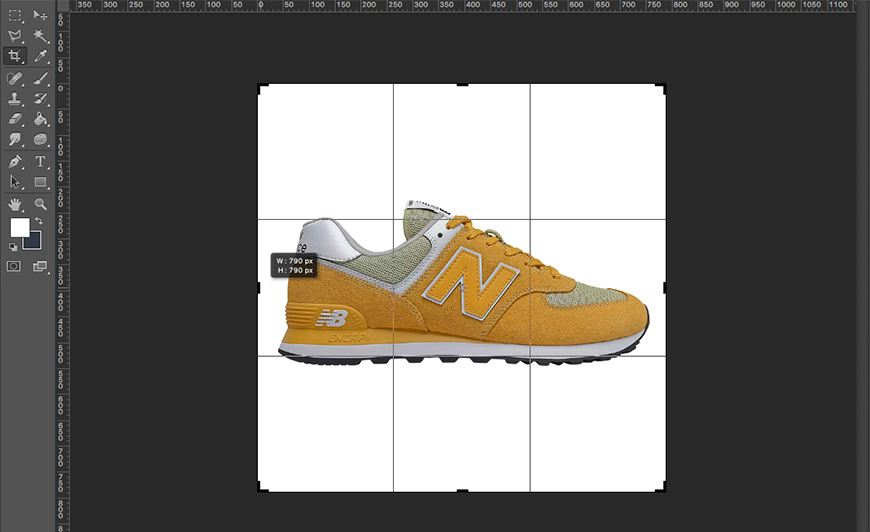
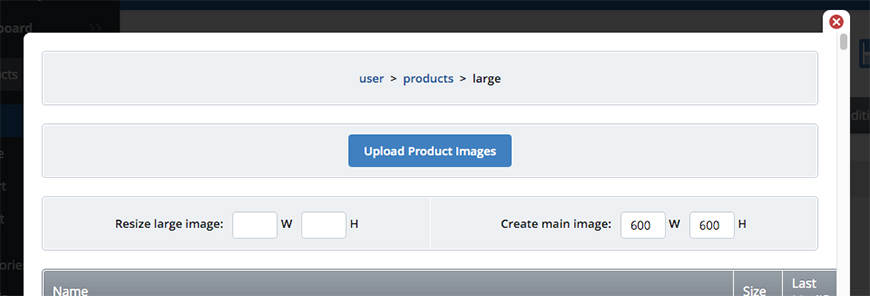
Consistent large/zoom and main image sizingConsistent images start with the large/zoom image, which is the only product image you need to upload to your site's admin panel. Therefore, make sure these are all set to the same shape and size, ideally 1000px x 1000px. The product image uploader in Bluepark will automatically populate the main image resize fields to the ones you last used. When you upload the large/zoom image, the system will then use these sizes to create the main image at the same time. If you are using the Import Products feature to import and assign all of your images, you can set your main image column to create your images in a standard size. Please get in touch to find out on how to do this via import.
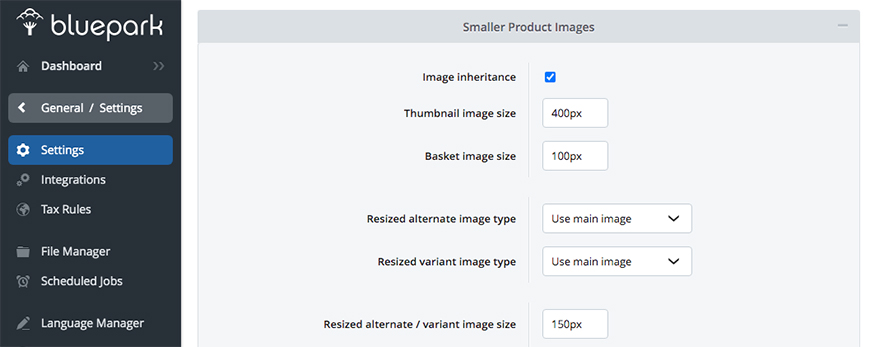
Consistent thumbnail and basket image sizingIn Bluepark V1, the thumbnail and basket image sizes can be set to specific sizes within General/Settings > Settings > Products tab > Smaller Product Images section. If you have been with Bluepark a number of years, make sure Image Inheritance and Unassign Thumbnail and Basket Images are ticked, in order to use this feature.
The Image Inheritance feature works by using the Main Image and adjusting it the thumbnail and basket images to the size you set in the Thumbnail Image Size and Basket Image Size fields. If you change these sizes, it will change the relevant images throughout the site. You can also set the image size for alternative images by adding it to the Resized Alternate/Variant Image Size field in the same section. These images are the thumbnails displayed underneath or to the side of the main image on a product page. The correct formatting of image namesWhen naming your images, it is best to use short, precise descriptive names that explain what the image is, rather than random numbers and letters. This will help search engines to identify the image and use it within their image searches, which helps SEO. Although this won’t have a huge impact on your main listings in Google, it will help your overall page rank as long as the image is relevant to the page. It is highly recommended that you do not use spaces or special characters in image file names as web browsers struggle to interpret them correctly. The only character that you should use is a hyphen and this should always be used instead of spaces. Below is an example of a product with file names that aren't optimised for using on a website and a file name that is optimised. 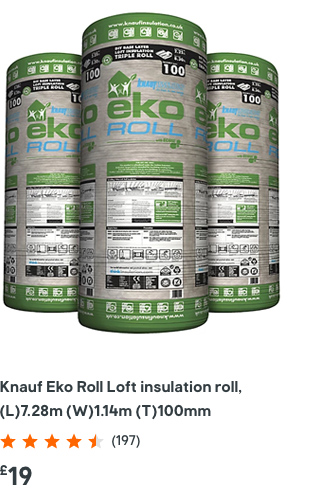 Not optimised 1004532.jpg (no keywords)
Optimised knauf-eko-loft-insulation-roll-100mm.jpg Optimisation is good practice for GoogleOptimising your images using the techniques above, not only helps to create a professional look that visitors will respond to, but also helps in terms of SEO. They help get your products in front of people via Google Image Search and they help to reduce page load times. Both of these factors will add ranking value to your site and will help Google index your site better. Try Bluepark for FREE for 14 daysFull access to everything including our support team, no card details required |
| ||||||||||


|