 | How to set up a Facebook shop31 July 2020 | Cate |
Setup a Facebook business account
The first thing you must do before trying to do anything business related on either Facebook or Instagram is setup a Facebook Business Account. This account allows you to manage your Facebook Page, Facebook Ads and Facebook Catalogue all from one place. These can then be connected to your Instagram account, so you can also create Instagram Ads and Instagram Shopping. A Facebook Business Account can be quickly setup by following the steps below.
- Go to the Facebook Business Manager and click on the Create Account button.
- Enter your normal Facebook email address and password to confirm your identity and allow the Business Manager to find your Facebook Page.
- Add in the required details, such as the business name and email address you wish to use, until the account has been created.
Add your product catalogue
Once your account is setup, you'll need to add your products, so both Facebook and Instagram can access them. To upload your products, follow the steps below.
Step 1: Export your product feed
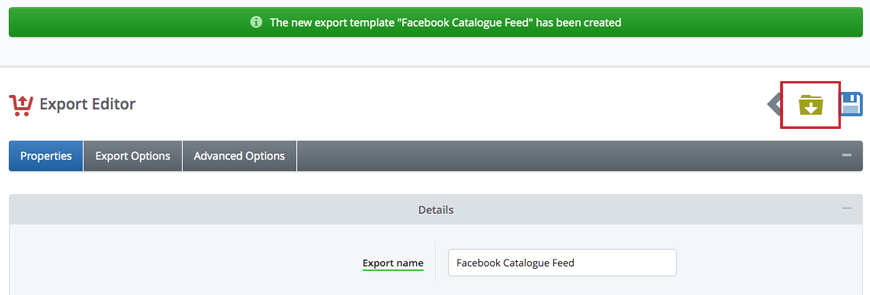
The first thing you'll need to do is export a feed from your Bluepark online shop. This can be done by going to Products > Export and clicking on the Facebook icon at the top right.
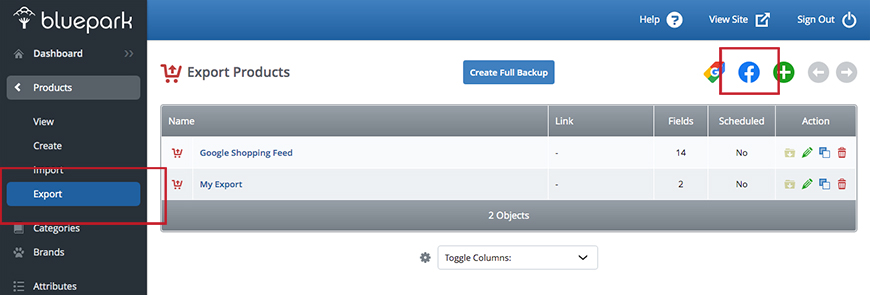
Next, click on the Download icon and save the file to your computer. This file has been specifically structured for Facebook/Instagram, so will be ready to upload to the Facebook Commerce Manager.
Step 2: Setup your Facebook product catalogue
This step only needs to be done one time. Once it's setup, you won't need to do it again.
- Whilst logged into the Facebook Business Manager, go to the Commerce section. This can either be reached via the left menu or via this link - https://business.facebook.com/products.
- Click on the Add Catalogue button and select E-commerce.
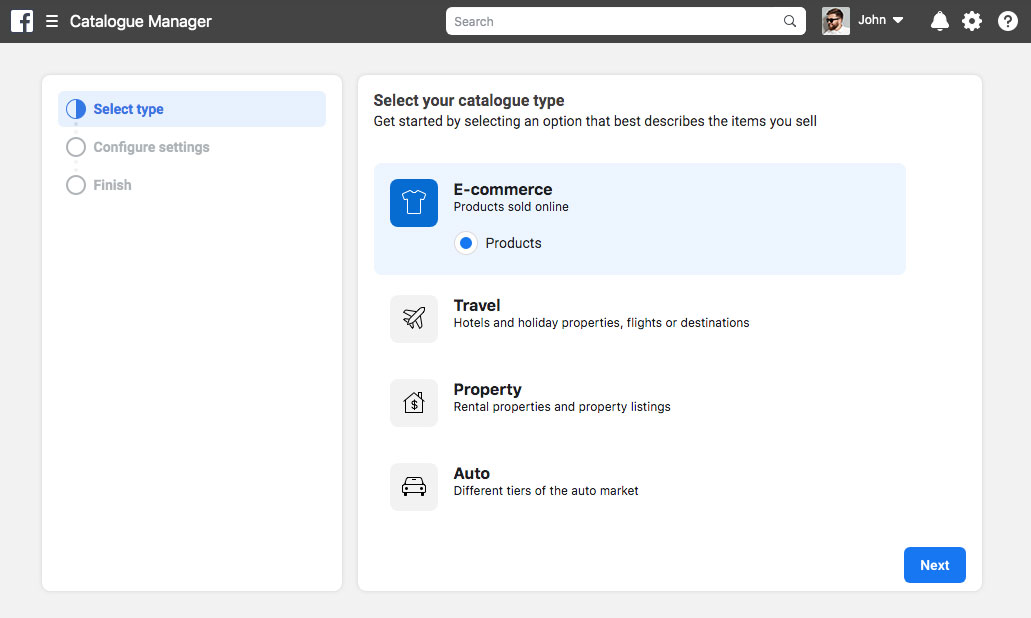
- On the Configure Your Settings page, select Upload Product Info.
- Choose the relevant business account from the Catalogue Owner drop-down and change the Catalogue Name, if you wish.
- Add your website address into the Website field and continue.
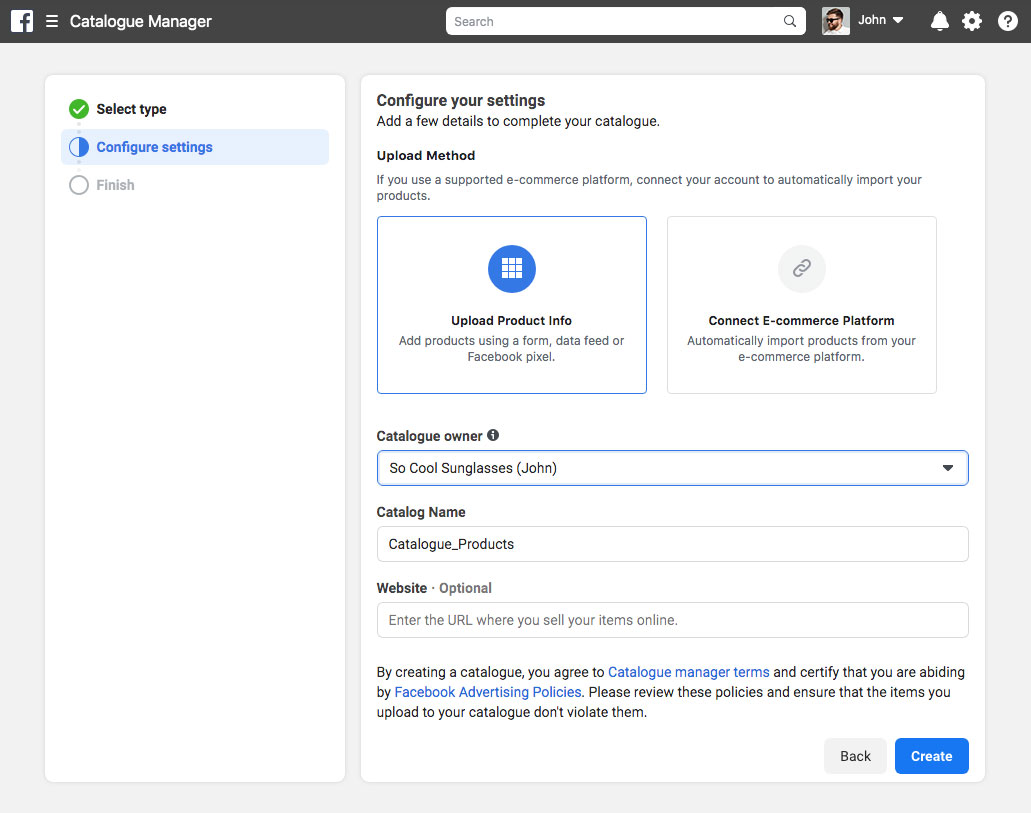
- Your Catalogue Manager will now be ready to have the products uploaded.
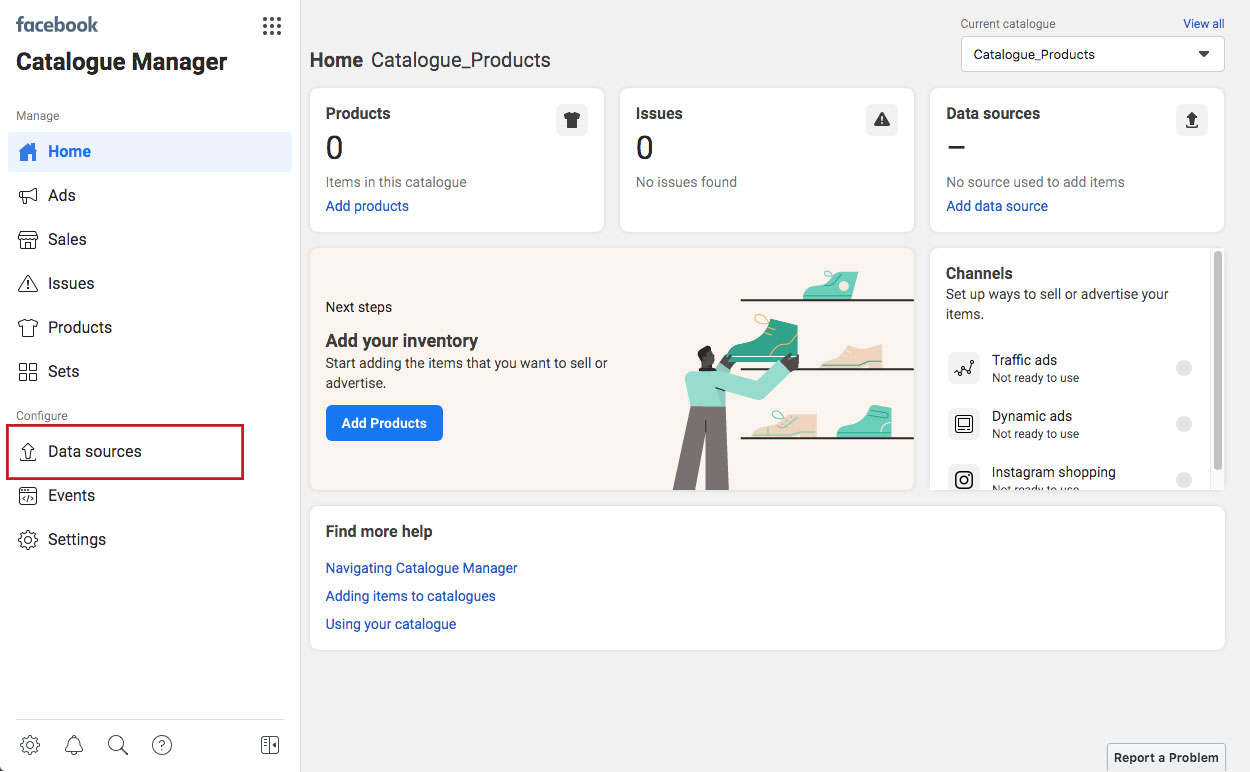
Step 3: Upload your product feed
This step only needs to be done one time. Once it's setup, you won't need to do it again.
- In the Catalogue Manager, click on Data Sources in the left menu, then the Add Products button and choose Use Bulk Upload.
- In the next menu, choose File Upload and upload the export file on the next page.
- Click Next and set the currency of the file, i.e. GBP - British Pound Sterling if in the UK.
The Facebook Catalogue Manager will then check each product as it uploads the file. Once completed it will give you a report of which ones have been successful and which ones haven't.
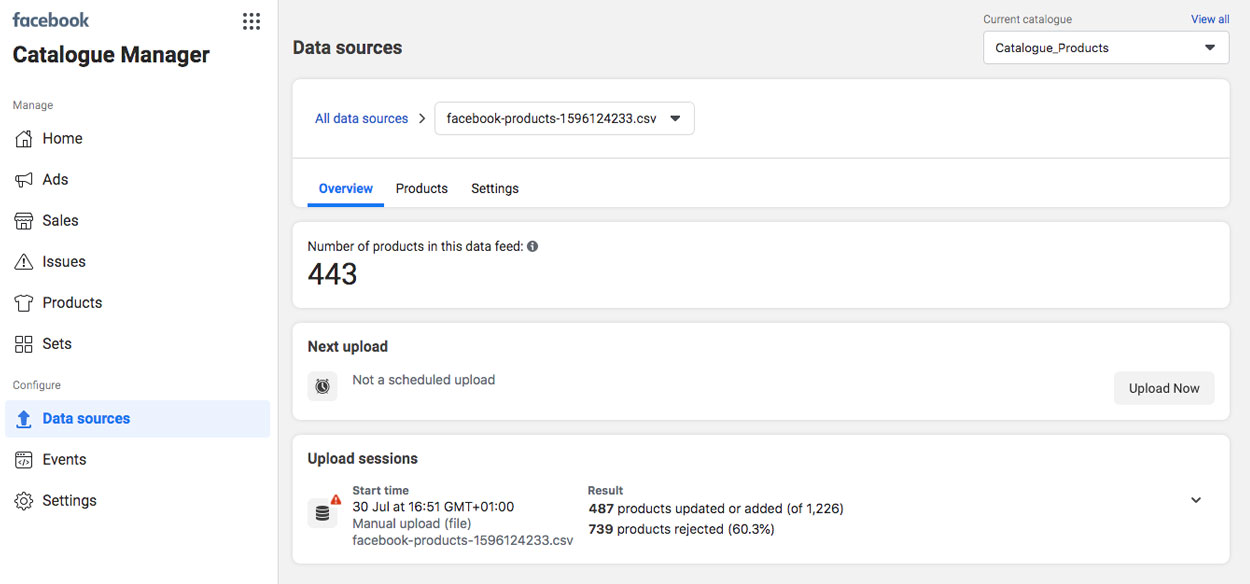
In the Upload Sessions section, click on the down arrow and then the View Report button to see a selection of the issues reported on the rejected products. Download the full report to view all rejected products and their issues.
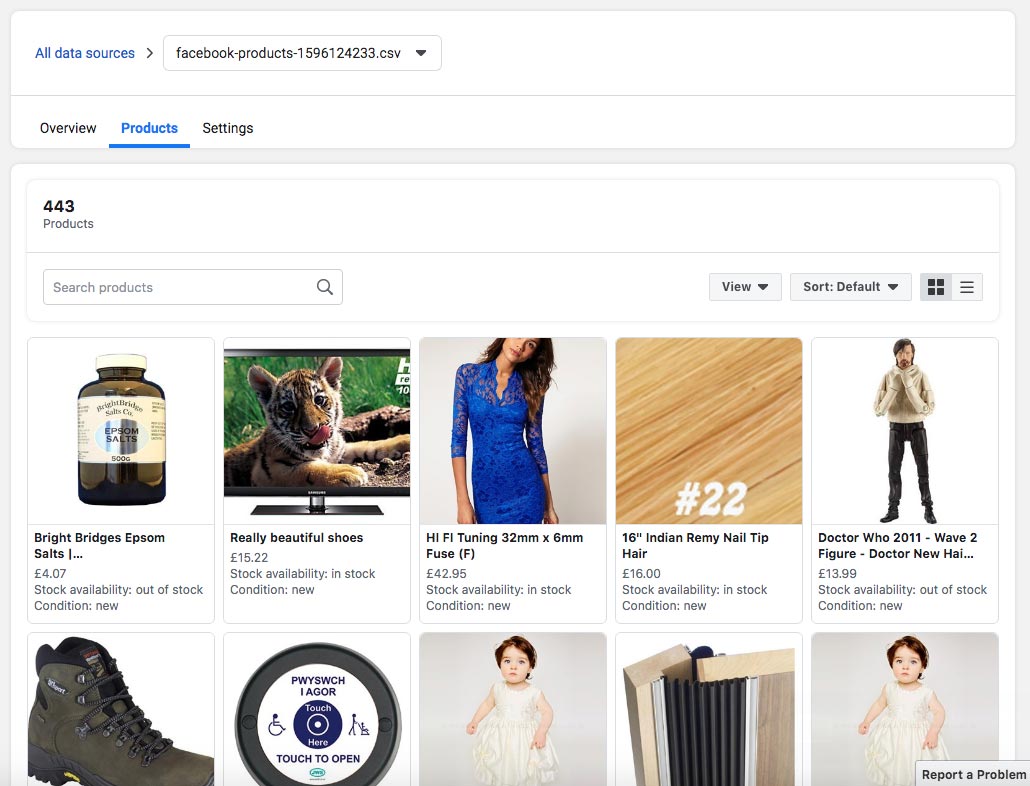
In the Products tab you will be able to see previews of the successfully uploaded products and each one can be edited or deleted by clicking on their image, should you wish.
You can find advanced options within the Settings tab. In here you can set optional rules for the feed, although these should only be changed if you know the reason your doing it. Otherwise, just ignore this section for now.
Create your Facebook shop
This step only needs to be done one time. Once it's setup, you won't need to do it again.
A Facebook Shop can be displayed in a tab within your Facebook Page and will contain products from your online shop that visitors to the page can click on and purchase. Follow the steps below if you wish to setup Facebook shop.
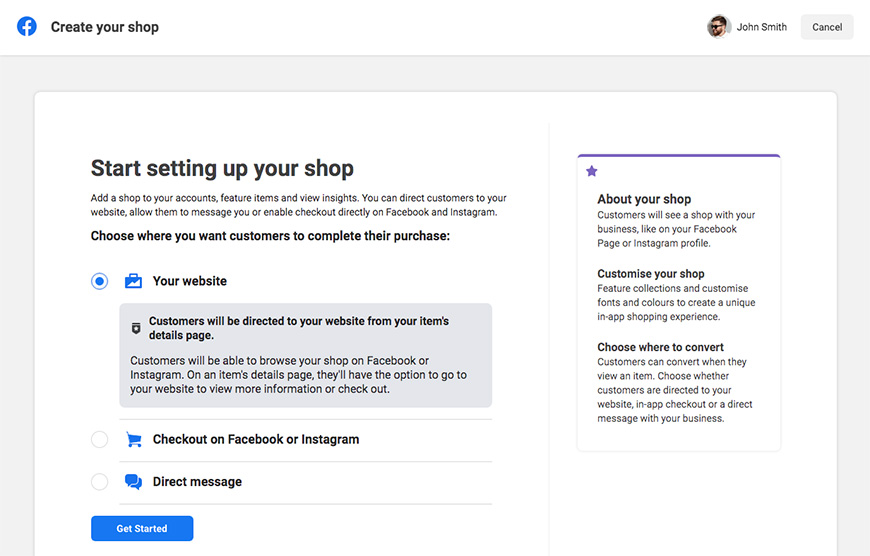
- Go to the Facebook Commerce Manager and make sure you're logged into your normal Facebook account.
- In the Choose Where You Want Customers to Complete Their Purchase section, select Your Website. This will allow customers to checkout on your website and pay using your integrated payment providers, rather than Facebook or Instagram's, and all orders can be processed together with your online shop and eBay orders.
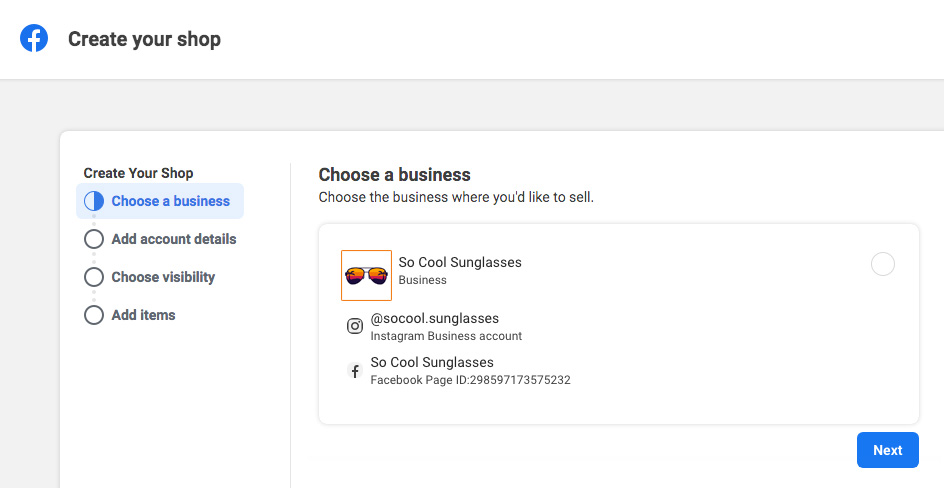
- On the Choose A Business page, select the profile or page you want to connect the shop to. If you've already connected your Facebook Page and Instagram Business accounts, these can be selected together. If not, your Instagram Shop can be setup later using our helpful How To Sell On Instagram guide.
- On the next page, add in a name for your Commerce Account and select the relevant Business Account from the list below to connect the two.
- Select the pages/profiles you wish to display your shop on.
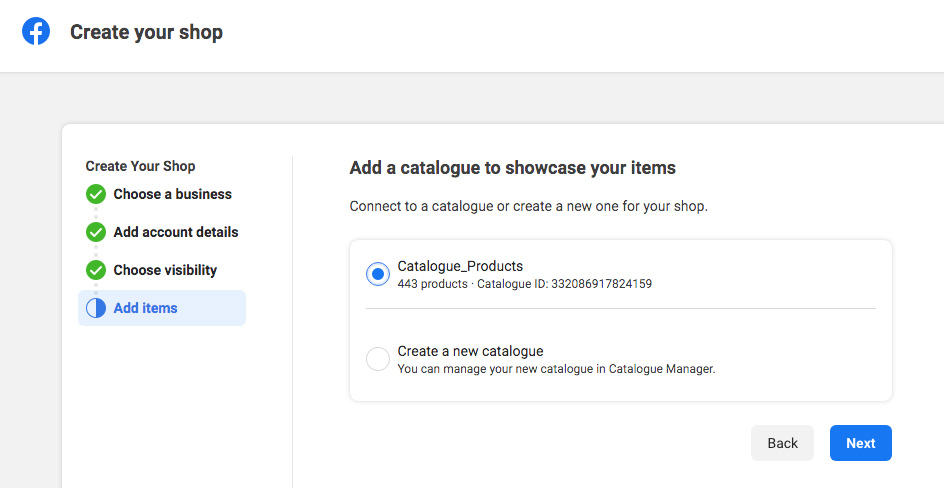
- Add your items by connecting to the product catalogue you've uploaded to your Business Account.
- On the next page, tick the Agree Merchant Terms box and click on the Create Your Shop button to submit your shop for review.
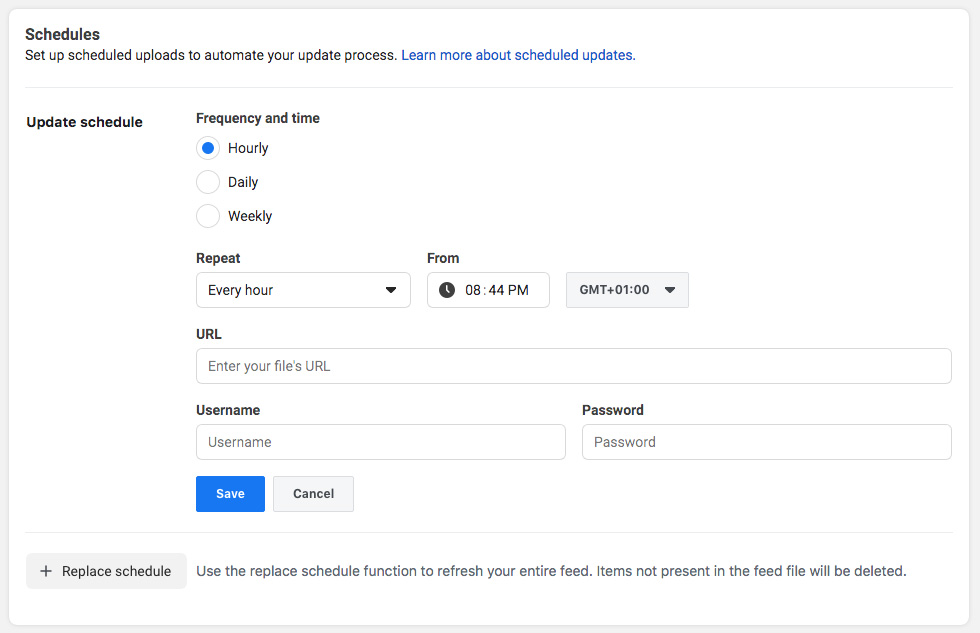
Keeping your shop up-to-date
Once your shop has been approved, all you will need to do from then on is keep your Facebook shop updated with your products. Just follow the instructions below for your website.
- In Facebook, go to Data Sources > your catalogue > Settings > Schedules section within your Catalogue Manager and choose either Replace Schedule or Update Schedule, depending on your needs. Please have a read of Facebook's About Schedules guide to decide which is best.
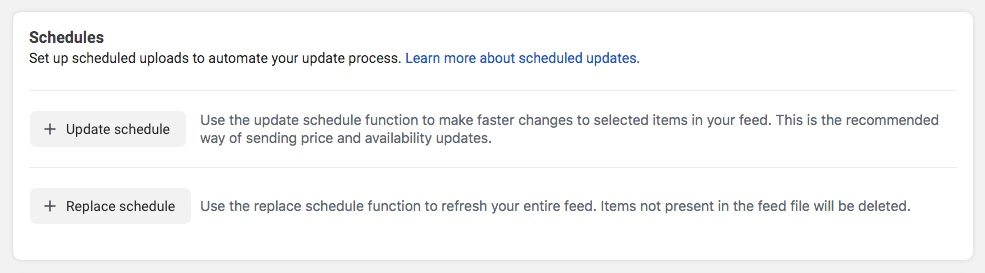
- Set a schedule that's easy for you to manage, such as once a day or once a week, depending on how often you update your products.
- The URL of the file should be set as https://www.yourdomain.co.uk/user/facebook-products.csv, and simply change the domain to yours.
- Username and Password can be left blank.
Retail and Business package sites only
- Just before the scheduled time, go to Products > Export Products in your online shop's admin panel and export a Facebook feed.
- Save the file to your computer and rename it to facebook-products.csv.
- Finally, upload the file directly into General/Settings > File Manager. Don't put it into a folder because Facebook won't be able to find it.
- Facebook will then pick the file up and process it at the scheduled time.
Enterprise package sites only
- Go to General/Settings > Schedule Jobs in your online shop's admin panel and click on the green plus icon to create a new schedule.
- Give the schedule a name, such as Facebook Product Feed, and select the Facebook export you previously created in the Job to Schedule drop-down.
- Set the File Name as facebook-products.csv.
- Set the schedule to run just before the one you've set in Facebook Catalogue Manager.
- Leave the rest of the options as they are.
- The job will then run at the specified time/day, then it will place the file in the File Manager automatically for Facebook to pick up and process.
The products listed in your Facebook Catalogue Manager can be used for your Facebook Shop, as well as Instagram Shopping. To find out more about how to setup Instagram Shopping, have a read of our how to guide below.
Recommended reads

How to sell on Instagram
Alongside the Facebook Shop guide, we've created a helpful guide to get you selling on Instagram. This uses the same Facebook products feed you've setup using the intrustions above.

How to use Instagram to boost your sales
With over 1 billion monthly users, Instagram holds a lot of potential for attracting new customers. Have a read of our helpful guide to find out how it can work for you.