As an online shop, you may want to offer products to different groups of people at different prices, or with exclusive discounts, or perhaps you want to offer them a completely different product range. These groups could be B2B customers, an online members club, or even different schools you supply. To segment customers this way, you would need to create a Customer Group, which you can then assign a selection of customers to, so they can have access to the private settings. Creating a Customer GroupIn Customers > Customer Groups, click on the green plus Create New icon at the top right of the page to create a new group and give it a name, i.e. Trade Only.
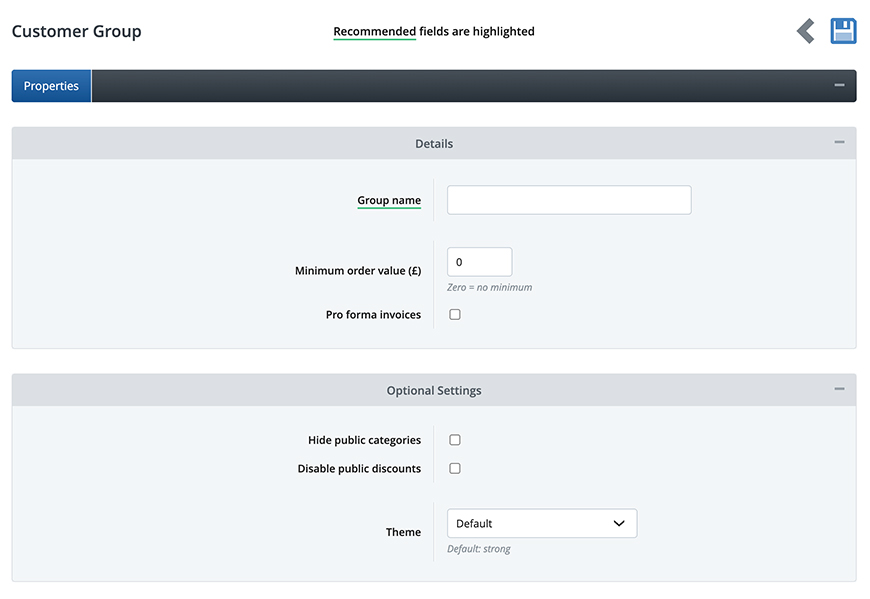
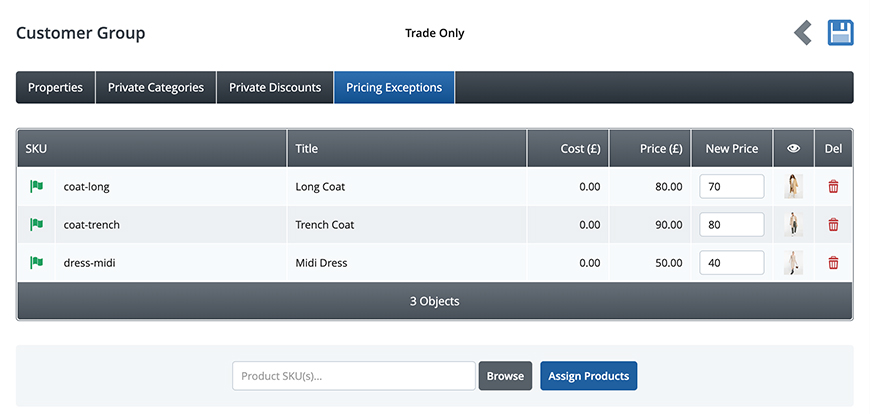
Next, you can set a minimum order value (MOV). Set this to 0 for no minimum order value or set it higher to ensure this group can't checkout until their basket total has reached that value. This works alongside the minimum order quantity (MOQ) set within the Values tab in the Product Editor. You can also tick Pro Forma Invoices, if you want this group to be able to access pro formas during checkout. If you don't want the group to purchase your main products, you can tick Hide Public Categories. Please note, the public categories won't be hidden until to assign a category within the Private categories tab. Tick Disable Public Discounts and Disable Loyalty Points if you don't want the customer group to benefit from these. Finally, you can create a unique theme for this customer group and assign it at the bottom. This is a great way to create a totally unique experience for your customer group, allowing you to sell and market to them in a way that works for that specific target audience. Once you are happy, click on the Save icon and three more tabs will appear next to the Properties tab. Private categoriesYou can create categories exclusively for customer groups, assign any of your products to them and, by setting them to private, they will not be visible to the general public. To create your private categories, go to Products > Product Categories and create a new category. In the Properties tab of the Category Editor, tick the Private option and add the rest of the category's information. Once saved, you will see the category listed at the bottom of the Private Categories tab in the Customer Group. Select the category and click on the Assign Categories button. You can have a read of our How to create product categories guide, if you're unsure of how to set up categories. Private discountsCustomer groups can also have their own exclusive discounts. These are set up in Marketing > Discounts along with public discounts but must be set to inactive, so that they remain private. Please note, you can only assign non-coupon code discounts to customer groups. Once you've created your discount, go to the Private Discounts tab in the Customer Group, select the discount from the drop-down and click on the Assign Discount button. You can have a read of our How to set up discounts guide, if you need help creating your discounts. Pricing exceptionsYou can give your customer group custom pricing either via discounts, as above, or by setting unique prices to each product within the Pricing Exceptions tab.
To do this, search for and assign products to the Pricing Exception tab via the Browse button at the bottom of the tab and give them their own prices within the New Price field next to the current price. Alternatively, for a large amount of products, it is best to utilise the Import Products feature and import the products using the Customer Groups section at the bottom of the Import Editor. You can have a read of our How to import and export products guide, if you've never done a product import before. Please note, if you want to specify custom pricing for variants, you will need to make sure the products are set up with their own variant prices in the Product Editor first. If you have only set the price within the Values tab in the Product Editor, the variants will not show in the Pricing Exceptions tab. Other settings & infoIf you're running a site that will be used by various types of customers, such as Retail and Trade, then a customer will need to be manually assigned to a customer group by an admin user before they can benefit from the group settings. In order to do this the customer must have a Customer account to start with. This could simply be created in the same way by asking them to create an account in the same way as all of your customers and then you assign the relevant customers to the individual groups. You may wish to add a field to your new account form so they can inform you that they are a particular type of customer, such as trade. Alternatively, you could put a contact form on your site especially for potential trade or online club member customers and ask them to provide their details, and then you can create their account for them.
Try Bluepark for FREE for 14 daysFull access to everything including our support team, no card details required |
|
|


